How do I bulk upload waitlists?Updated 4 months ago
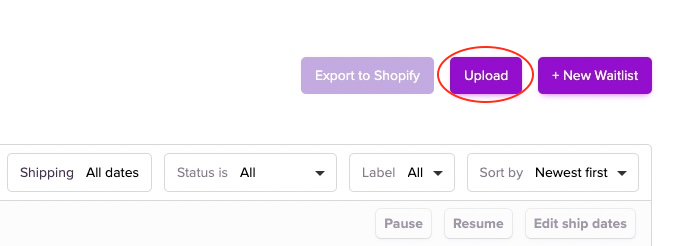
Now, you can create multiple waitlists by hitting Upload in the Waitlists tab of the dashboard.
Download the sample file
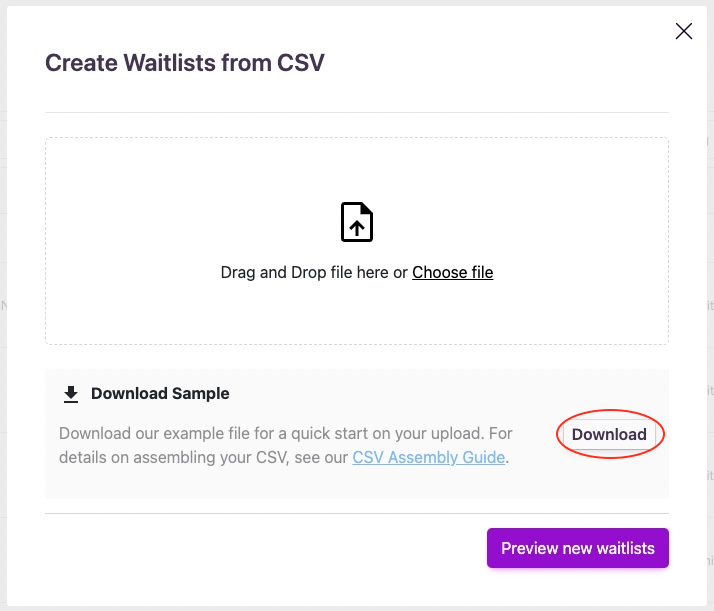
Replace the example data with your own following the steps below, including all of the Required Fields.
Required Fields
- product_handle
- sku
- units_on_preorder
- earliest_ship_date
- latest_ship_date
- launch_date
- launch_time
- replicate_to_stores
- labels
Steps to Create the CSV
- Access Your Shopify Account:
- Log in to your Shopify admin panel.
- Navigate to the ‘Products’ section.
- Export products from Shopify into a CSV
- Select the products you want to export.
- Bulk Actions > Export
- Choose CSV file format in the export options.
- Format the CSV as per the sample file in Purple Dot
- Delete all columns except Handle and Variant SKU
- Format and add the following column headers: product_handle, sku, units_on_preorder, earliest_ship_date, latest_ship_date, launch_date, launch_time, replicate_to_stores, labels.
- Calculate units_on_preorder:
- Determine the quantity of units for each product or variant available for preorder.
- Determine Shipping Dates:
- Identify the earliest_ship_date and latest_ship_date for each product or variant. These should be in the format yyyy-mm-dd (e.g., 2023-04-01).
- If not predetermined, estimate based on shipping and handling times.
- Determine launch_date and launch_time:
- Choose when you want waitlists to launch for each product or variant in yyyy-mm-dd and hh:mm (24-hour time) format.
- This is optional, if blank, waitlists will go live immediately.
- If you have multiple stores that share a single warehouse, choose which other stores to replicate this waitlist in:
- Replicated waitlists sync allocated pre-order inventory across several selected stores.
- Note: each store has to use the same product handle and SKUs for this product.
- Enter each additional store's "myshopify.com" address, separating multiple stores with "|". Do not add the current store's address.
- Alternatively, you may leave this field blank if you only have a single store or do not wish to sync inventory.
- Add a label:
- Assign a label for easy management, e.g., container name or purchase order code.
- 0-9, A-Z, underscore & hyphen only, no spaces Eg. “container_1” or "PO1234"
- For multiple labels, separate each one with a "|"
- This is optional.
- Export as CSV:
- Save or export the file in CSV format.
- Ensure that the file is named appropriately and is easy to identify.
- Upload the CSV File:
- You will then be shown a preview of your first three waitlists, check that it has included the information.
- When happy, click Create Waitlists.
Additional Notes
- Accuracy is Key: Ensure all data, especially the Product Handles and SKUs, are accurate to prevent errors during processing.
- Format: Verify that the format matches the sample file, especially the column headers
- Checking for Errors: It’s advisable to double-check the CSV file for any mistakes or formatting errors before uploading.